

For new Old School RuneScape players, Scurrius is probably the first bit of PVM you’ll ever do that has actual mechanics. In this guide, I’ll be going over everything you need to know in order to beat it for the first time.
This fight is a great way to ease yourself into more challenging encounters, from Jad all the way to Hunllef in the Corrupted Gauntlet. Scurrius will teach you how to survive OSRS‘ deceptively mechanically-intensive boss fights. It’ll show you that PVM is nothing to be intimidated by, nor does it require “prayer flicking” or “tick eating” or whatever other buzzwords you’ve seen/heard online.
Let’s get started!
What Are the Recommended Stats & Gear?
The only real requirement for a Scurrius attempt is at least 43 prayer. This will give you access to all three of the protection prayers, which you’ll need if you want to avoid all damage from the boss itself. Aside from that, 40s or more in all of your melee stats (attack, strength, and defense) will be comfortable enough.
When it comes to gear, the bare basics will be a rune scimitar and the best armor you’ve got. No need to overcomplicate anything, because you can do the fight without taking any meaningful damage once you get used to it. Here’s the beginner’s loadout:
- Weapon: Rune Scimitar – This is just the minimum. If you have a dragon scimitar or longsword, those are better.
- Offhand: Rune Sq/Kiteshield – If you somehow have access to it already, a Book of War is a very cheap and effective alternative that gives extra strength and a high prayer bonus.
- Armor: Full Rune – This includes rune boots, if you can buy some. For ironmen, use climbing boots instead.
- Gloves: Combat Bracelet – This is the “best” option unless you already have access to at least adamant gloves from Recipe For Disaster. If you’re an ironman, the lesser-known Klank’s Gauntlets from Underground Pass can work too, if you’ve already done the quest.
- Amulet: Amulet of Strength/Power – Either works fine. It really won’t make a huge difference.
- Supplies:
- Prayer Potions – At least 3-4 for a first attempt. Moonlight Moth mixes are a free alternative, but these require a pretty high hunter level to start gathering.
- Combat Potion – To keep a very low budget, a single combat potion will suffice.
- An Emergency Teleport – Either bring runes to teleport out, or carry something like a charged Chronicle with you.
- Food – Fill the rest of your inventory with the best food you can get. Lobsters or higher, at the very least.
No-Damage / Minimal Damage Setup
Once you’re more comfortable with the fight or want to try avoiding all (or most) damage completely, even on a first attempt, substitute your gear with the following:
- Monk’s Robes – These can be acquired for free at the Edgeville Monastery.
- Initiate/Proselyte Set – These require you to go through the Temple Knight questline, and they give you extra defense in case you make a mistake.
- Holy Symbol – If you want to maximize your prayer bonus, you can use this over the other amulets. Your hits will be weaker, but it’ll work fine if you’re practicing prayer switches.
Facing Scurrius – Full Guide
How Do You Find Scurrius?
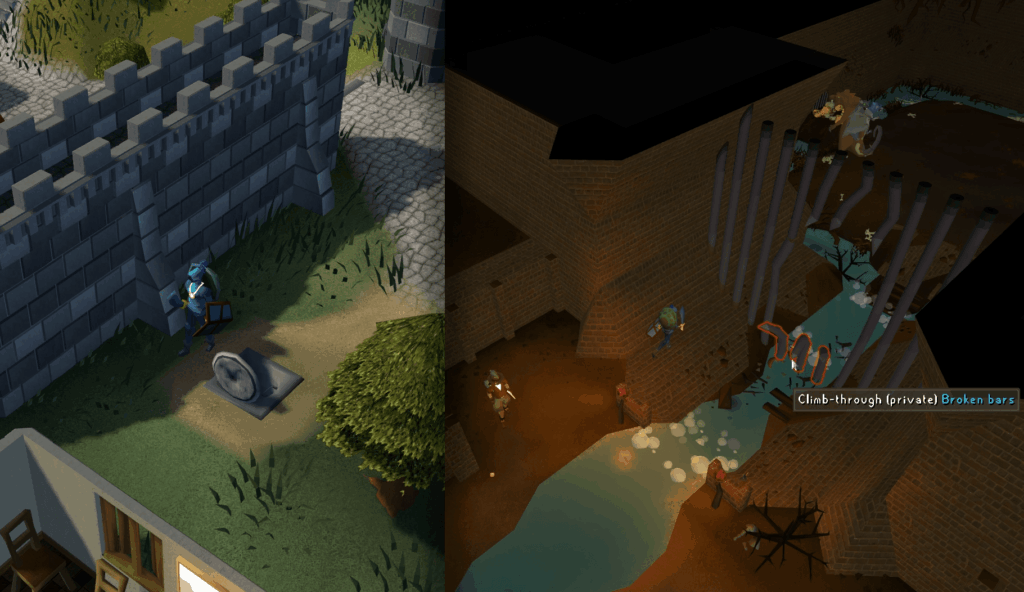
In order to get to Scurrius, you have to go through the manhole to the east of Varrock castle. Just across the wall from where the tree patch is, open the manhole and proceed straight to the east once you’re underground.
At the easternmost corner, you’ll come across a broken set of bars that the sewer water is flowing through. Before you go in, make sure to select “Climb-through (private)”. Avoid the public instance, because the group version of Scurrius will have much higher HP than the private one.
You don’t get a bonus for beating the group version while playing solo. It literally only makes him tankier without any extra loot or mechanics.
Scurrius’ Mechanics
Before I go over the mechanics, I want you to turn on the game’s sounds, as there are particular cues to listen for during the fight. Trust me, this will make the fight much easier to learn.
Phase 1 – Roaming Rat
As soon as you enter the arena, Scurrius will stomp the ground and cause bricks to fall from above. Avoid the shadows and start praying Protect from Melee as you approach the boss.
Attack Scurrius and dodge any shadows whenever he stomps the ground. These will almost always appear right under your feet whenever he stomps, so be ready to move even just one tile to the side while attacking him.
As long as you have Protect from Melee on, his attacks during this phase will not deal any damage. Eventually, once his HP hits a certain threshold, he’ll run towards one of the food piles in the arena.
While he’s eating, Scurrius will not attack with melee, but he’ll heal a bit of HP every few seconds. Continue attacking him, but watch out for the following attacks (they all have distinct sound cues):
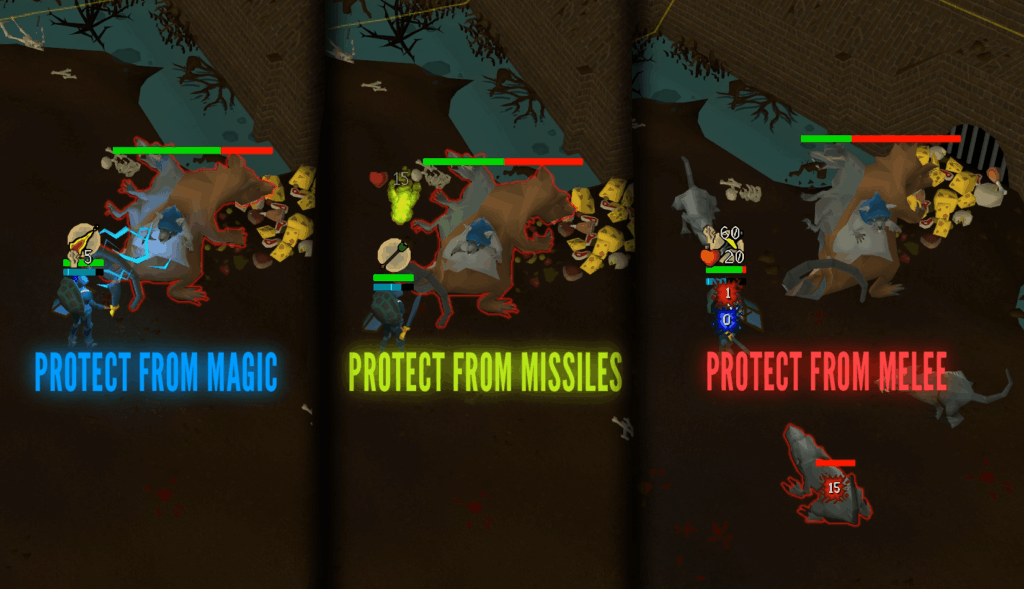
- Magic Attack – When Scurrius gets a faint blue glow, the blue head on its back will shoot bolts of lightning towards you. Turn on Protect from Magic before it hits you to block all of its damage.
- Ranged Attack – The grey head will launch a green projectile (kinda looks like a fart cloud) towards you. Turn on Protect from Missiles before it hits you to block this.
- Stomp – Occasionally, Scurrius will continue trying to drop bricks on your head. Be ready to step away at all times.
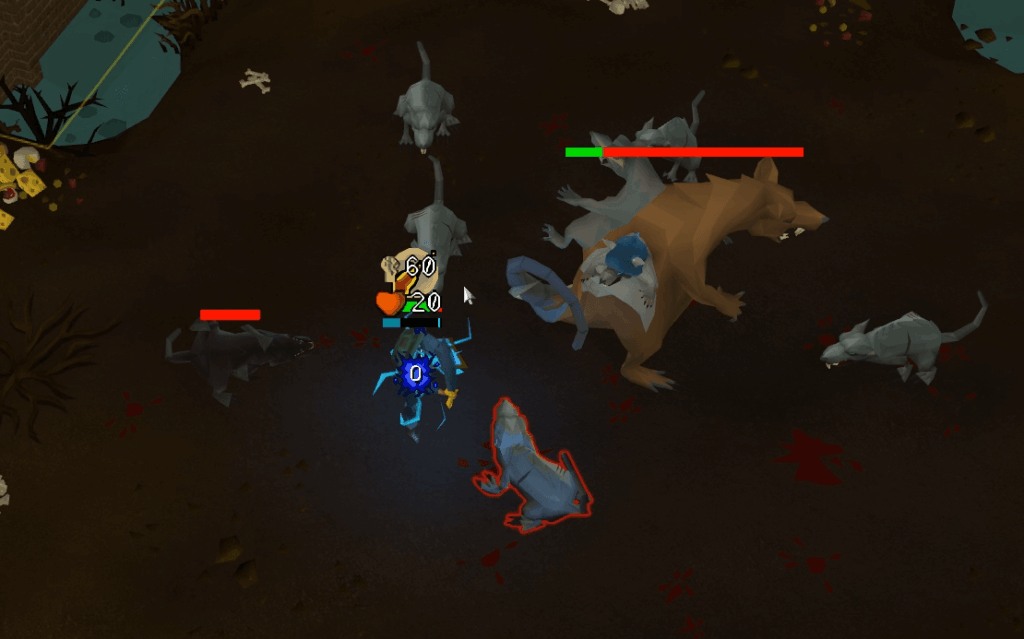
- Additional Rats – Scurrius will sometimes screech loudly without attacking you. Whenever he does this, 6 rats will spawn nearby.
- Use Protect from Melee to block most of their damage. They can still hit you through it, but only up to 1.
- These rats die in one hit no matter what!
- If you’re a learner, I highly recommend killing them first. You’ll take more damage from them than Scurrius’ ranged/magic attacks if you aren’t praying against them.
When Scurrius is done eating, he’ll go back to chasing you around with his melee attacks. As soon as he turns away from the food pile, pray Protect from Melee immediately. From here, the fight will keep repeating this loop of “chase -> food pile -> chase -> food pile -> etc” until his health gets low.
Phase 2 – Center of the Room
Once his HP is low enough, Scurrius will walk towards the middle of the arena. When he does this, he will no longer attack with melee for the remainder of the fight. Throughout this phase, he’ll randomly use the same attacks that he uses while at a food pile, except this time he won’t heal back up.
This is basically an enrage phase, and he will cycle through his moves much faster. Remember, the projectiles will only deal damage to you once they land, and you should be fine as long as you pay close attention to his animations and sound cues.
The main thing you’ll need to worry about here are his constant stomps and rat spawns. If you’re unlucky, he’ll keep forcing you to move around and deal with giant rats. Try your best to stay calm and remember the following tips:
- If he stomps, step to your left or right and continue attacking him. It’s not rare for bricks to fall next to each other, but unless he stomps more than once in quick succession, a sidestep is all you’ll usually need.
- Whenever he spawns rats, don’t run around. Some of these will usually get stuck behind Scurrius, so just deal with any of the giant rats that can reach you and ignore those that can’t get close.
- Unless the rat spawns are overwhelming you, focus on protecting against Scurrius’ attacks. Since he attacks faster in this phase, eating too many projectiles can actually get you killed here.
That’s pretty much it. From this point forward, you just have to keep hitting Scurrius until he dies. He’s far from being a lucrative boss, but there are definitely upsides to fighting him repeatedly.
Why Should I Fight Scurrius?
You should be fighting Scurrius as a way to prepare for higher level boss encounters, which will involve a lot of bouncing back and forth between prayers. Your next step up that will make use of this mechanic will be the likes of Hueycoatl and Sarachnis.
As you get used to the fight, you can even use this boss as a practical way to practice actual prayer flicking, which is where you use protection prayers without spending any prayer points. I won’t cover that here, but I will tell you that Scurrius is exactly where I learned to do it, and it helped me get my first ever fire cape on my ironman while having limited supplies back then.
Does Scurrius Drop Anything Good?
Scurrius isn’t a very lucrative boss, but he does usually drop prayer potions and rune gear, which can net you around 10-30k gold. On the low end, you might just get a handful of fish from him, which is usually just a refund of the food you used if you had to eat during the fight.
The most important thing it drops, however, is the Scurrius’ spine. This can be used to craft one of three bone weapons (one for each combat style), and these are only good for this fight in particular. The bone mace is usually what people go for first.
In case you didn’t notice, Scurrius grants higher combat experience than normal enemies, and a bone mace significantly increases your damage output against him. It also removes the attack delay for his rat spawns, letting you clear them out in a couple of seconds. These buffs make the boss fight a very viable training method.
Later on, you can move on to bosses like the Royal Titans, which will have you practicing gear switches instead of prayer swapping. If you’re still a bit intimidated by PVM, you could always try the chill Barrows activity instead, as you don’t have to swap anything mid-fight there.
And that’s a wrap for this ratty boss. Good luck!