

So, you’ve just completed Song of the Elves in Old School RuneScape and now have access to the Gauntlet. The corrupted version of this activity is a pretty good moneymaker, and it has a much better chance of giving you incredibly valuable crystal seeds.
I still see a lot of people struggling with it, including people in the clan I’m in. This guide will try to help you get more consistent CG clears, or even your first one if you haven’t done it before.
Gameplay video included further below, and it’ll showcase an average run from start to finish with no fluff or jump cuts.
EDIT (07/22/2026) – With the Summer Sweep-Up update of July 2026, they’ve made a few changes to the prep phase. I’ve edited the sections below to reflect this!
Before Entering the Corrupted Gauntlet
The Corrupted Gauntlet requires no gear at all, because it’s essentially a minigame where you have to make your own gear and supplies. It’s almost like a roguelike game within OSRS, so you’ll feel right at home if you love playing those like I do.
What Are the Recommended Stats?
Ideally, you’ll want to have high combat stats. You can get by with high 80s, though higher is obviously better. You should be pretty comfy with 80-90 in all combat stats, with at least 70 prayer (for Piety).
I have over 500 clears while writing this, and I got through a decent chunk of that with just under 80 defense and barely 90 range and magic, but your mileage will vary depending on how fast it clicks with you.
Consider unlocking the Mystic Vigour and Deadeye prayers from the Royal Titans too. These will help a bit with the boss, but they aren’t essential. If you somehow have Rigour and Augury, even better.
RuneLite Plugins
If you’re using RuneLite, go and add “The Gauntlet” to your list of plugins. Also, make sure to turn on “Highlight true tile” under the built-in “Tile Indicators” plugin.
As for your settings, just follow the setup that I have in the image below. I’ll explain what these are for once you’re done setting things up, though most of these should be the default if I recall correctly:

First up, the “Tile Indicators” settings are completely optional, but they make it easier for you to determine where your character actually is and where they’re going whenever you click. This can be very helpful during the actual boss fight when you’re avoiding hazards.
As for the settings under “The Gauntlet”, all these will do is highlight all of the resources and demi-bosses in the activity just for clarity. Outlining Hunllef and the tornado tiles (true tile) will help you prevent a lot of avoidable damage, especially while you’re learning.
For the sake of this guide, I want you to ignore the resource tracking component of the plugin. I’ve found that trackers just add unnecessary pressure while learning the content, as you’ll likely be focusing on it way too much.
Starting the Gauntlet
Double check all of your plugin settings and make sure that your UI is set up in a way that you can comfortably and quickly swap menus and prayers. When you’re ready, enter the Corrupted Gauntlet by clicking on the “Enter-corrupted The Gauntlet” option at the portal!
Preparation Phase
During the prep phase, your goal is to gather resources and make both weapons and armor for the final fight. To do this, you have to go through randomized rooms and hopefully get everything you need within the 7-minute and 30-second (7:30) time limit.
The nodes for crafting resources, whether it be ore, wood, or cotton, will each give you three pieces of their respective materials. Fish nodes give you four pieces of raw food each, while the herb ones only provide you with a single leaf.
Enemies come in two different types. The smaller ones (rats, bats, and spiders) drop fewer shards than the larger variants (wolves, unicorns, and scorpions). Both are worth killing as long as you still need shards, and they’re guaranteed to give you a weapon frame if you don’t have one yet.
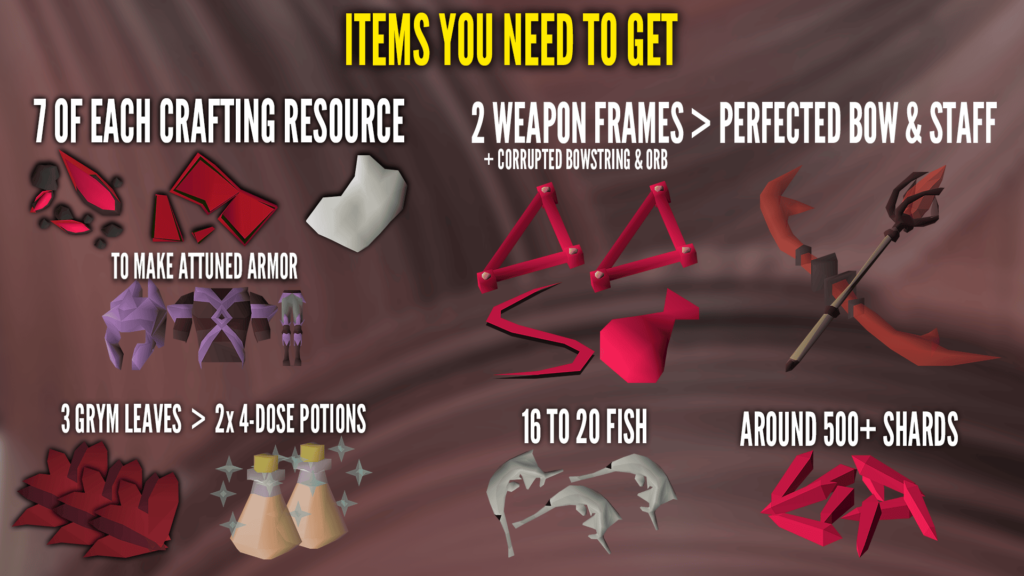
To get the ideal setup for this laid-back method, you’ll need to find the following things:
- 7 of each crafting resource (ore, wood, and cotton) for a set of attuned armor. This means you have to find:
- 3x Wood nodes (green)
- 3x Ore nodes (red)
- 3x Cotton nodes (white)
- NOTE: These resources now stack, so each of them will only take one inventory space.
- 3 herbs (Grym leaves) to be turned into three potions and then combined to make two 4-dose potions.
- Enemies can drop these.
- Around 20 fish
- Enemies can drop these too.
- 2 weapon frames
- Make a bow and staff.
- 1x Ranged demi-boss (Dark Beast – green outline)
- Will drop a Corrupted Bowstring
- 1x Mage demi-boss (Dragon – blue outline)
- Will drop a Corrupted Orb
- Roughly 500+ shards to make everything. Don’t think about it too much. Just get more if you run short.
- NOTE: Shards are automatically picked up as of the Summer Sweep-Up of 2026, so you save more time.
Navigating the Map
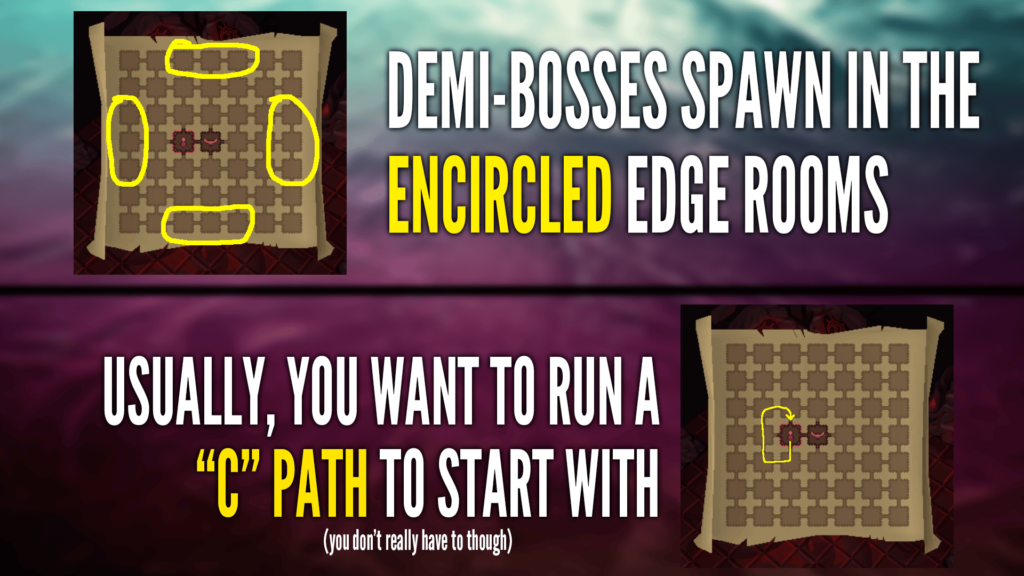
Demi-bosses all spawn in certain corners of the map, which I’ll highlight in the image below these subsections. When it comes to going around the map, the general tip people give is to follow a C-shaped path and check for bosses along the way.
You don’t have to strictly follow that though. Depending on the room layouts, you might find an opportunity to reveal a room that isn’t a part of the path before you can continue through it. If it has resources you’ll need anyway, then just go in there and grab them.
As long as you aren’t dangerously low on time, you’ll mostly be fine running all over the place.
Regarding the Bear & Duplicate Bosses
There is a bear demi-boss, which will have a red outline. For this method, we’re going to ignore the bear, as it drops an upgrade for the melee weapon that we won’t be using.
Also, if you’ve already killed one demi-boss and you encounter another of the same type, it has a chance to drop one of the other two corrupted upgrade pieces. For example. If you kill a dragon, you’ll get the corrupted orb. If you kill another dragon, you will get either a corrupted bowstring or spike.
Because of this, you’ll want to avoid killing dupes if you’re running low on time. If RNG is being jerk, there’s a chance that you’ll spend more time killing a dupe that drops a spike than you would have spent simply running around looking for the correct demi-boss.
You can also kill the bear if you encounter it early. This will guarantee that the next dupe wont be a spike, and you can also use the mortar & pestle to turn the spike into shards. Again, though, don’t bother if you’re short on time.
How a Typical Prep Flows (VIDEO INCLUDED)
If you’re going to follow the “C” path tactic, focus on getting crafting resources first and kill any enemy you run into until you get a weapon frame. Don’t pick up any Grym leaves or fish yet, but take note of their nodes, if any.
Check the possible demi-boss spawn locations along your path, and take note of any dragons or dark beasts. Don’t engage them until you have an actual weapon. There’s a guaranteed demi-boss spawn in the north, east, west, and south-most tiles.
Ideally, you will want to find at least one of each crafting resource node (ore, wood, and cotton) in the path. This will let you make a set of basic armor to start with, as its pieces only require one of each material.
After following the “C” path, you should also be able to make a weapon at the very least. If you have one or both of the desired bosses revealed (dragon & dark beast), make their respective base weapon and upgrade it if you have the shards to do so.
With a set of basic gear and a weapon (preferably attuned), you should now have enough room for three vials and grym leaves, even if you’re carrying the materials for attuned armor. Go and find a corrupted orb & bowstring while gathering more shards and making the potions along the way.
Once you have enough to make attuned armor and both of the perfected weapons, you’ll typically have around 2 minutes left over to get some fish and cook them.
To sum it up, this is how my personal strategy goes:
- Run the “C” path in search of all the necessary materials for attuned armor.
- Only run back to the starting point if you can make the following:
- Basic armor set: 3x cotton, 3x wood, 3x ore, and 120 shards
- Three vials: 30 shards. Fill them with water before leaving.
- Bow or Staff: Weapon frame and 20 shards (If you have an extra 60 shards, upgrade it to attuned)
- Search for a corrupted orb & bowstring while killing enemies along the way for shards. Bosses are guaranteed to drop a weapon frame, so pick one up from them too.
- Gather Grym leaves and finish making potions with them while running around too.
- Use the mortar & pestle to grind 30 shards to make 30 dust for the potions. Drop the mortar & pestle afterwards.
- Use the free teleport crystal once you can make attuned armor and both of the perfected weapons (bow & staff).
- Running back is fine if you’re near the starting point.
- If all the fish nodes are too far, craft another teleport crystal if you used the freebie (will cost 40 shards).
- Use the remaining time to fish and cook.
Below is a video example of a full prep and boss kill that I recorded while writing this. Pause the video just before the final boss if you want to continue following along here:
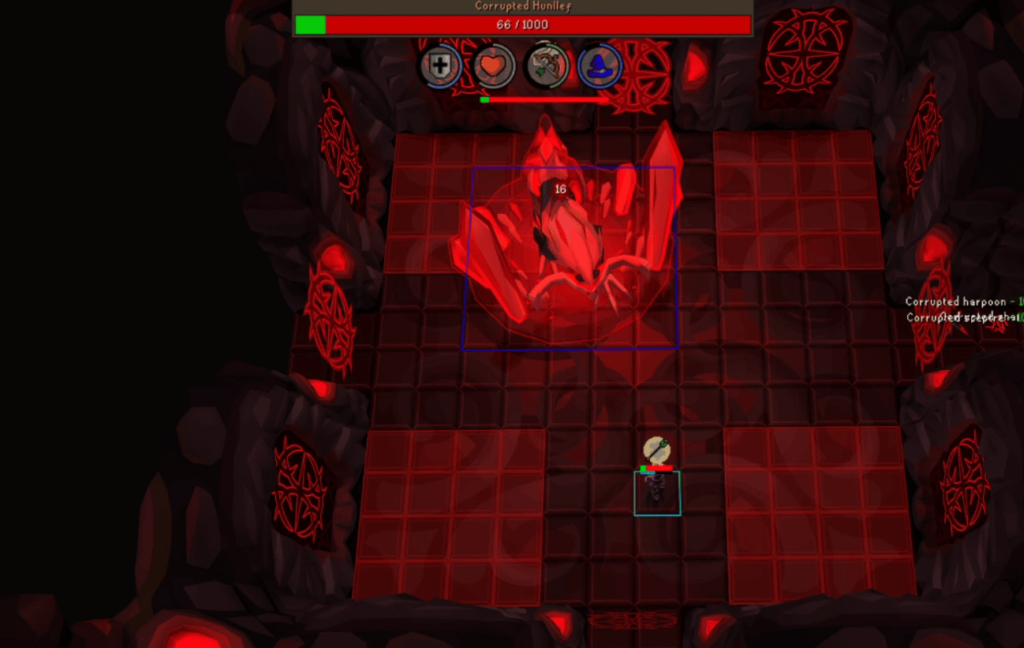
The Corrupted Hunleff Fight
The mechanics during the final boss fight of the Gauntlet are actually pretty easy to understand. You just need to keep practicing and you’ll eventually build up the muscle memory to beat it with ease. Let’s break down each mechanic through a list.
IMPORTANT NOTE: I’m purposefully not mentioning certain numbers in this part of the guide. Some of the mechanics trigger after a set number of attacks from either you or the boss, but trying to keep track of these while still learning the content can very easily lead to mistakes.
The goal here is to prevent you from overthinking things and encouraging you to simply adapt to what’s happening at the moment. Feel free to unpause the video above and use this list of mechanics as a reference:
- Hunleff’s Overhead Prayers – The boss will always have a protection prayer up at all times, even before you enter the arena. It will occasionally swap to block whichever style you’ve been hitting it with.
- If Hunleff starts praying mage, switch to the bow. If it prays against range, swap back to the staff. Just pay attention to the colored outline added by The Gauntlet plugin:
- Red: Protecting from Melee (Irrelevant in this method)
- Green: Protecting from Range
- Blue: Protecting from Magic
- If Hunleff starts praying mage, switch to the bow. If it prays against range, swap back to the staff. Just pay attention to the colored outline added by The Gauntlet plugin:
- Hunleff’s Base Attacks – At the very start of the fight, it will attack you with range (pointy projectiles), so use Protect from Missiles when entering the arena.
- After a few shots, Hunleff will let out a loud audio cue before attacking. Afterwards, it will play a special animation and sound to signify that it has swapped attack styles.
- When it first swaps, switch to Protect from Magic. It’ll start attacking you with orbs now.
- Occasionally, it will fire a purple projectile that also makes a distinct sound as it travels and when it hits you. This will shut off your prayers, so be ready to turn them back on.
- The prayer disrupting move only occurs while it’s attacking with magic. However, it can shoot this as its last attack before swapping, so there will be times where you immediately use Protect from Missiles after getting your prayers shut off.
- Prayers do not provide full protection. You can and will take damage no matter what.
- With a full set of attuned armor, its attacks will only hit you for a maximum of 10 damage.
- Don’t stand anywhere inside Hunleff’s tile. This can trigger an unavoidable stomp attack that deals a ton of damage.
- Floor Tiles – Throughout the whole fight, parts of the floor will be highlighted in a different shade of red, and these will turn yellow after a few seconds. Do not step on these when they activate.
- As Hunleff loses health, the activation time for these floor tiles will get faster.
- Once Hunleff reaches low health, these floor hazards will follow a fairly predictable pattern that you can completely avoid for the most part. This is covered in the video example.
- Tornadoes – Every now and then, Hunleff will stomp the ground and spawn tornadoes that will chase you down. Run away from them until they disappear.
- The number of tornadoes will go up as the boss loses health, capping out at four near the end.
- As a learner, don’t try to do anything fancy. Play it safe and just run away, because these things can melt through your HP.
These are all of the attacks and hazards to keep in mind during the fight. The most important thing is that you play with audio on and pay close attention to the sound cues. The boss’ every move is accompanied by a unique sound, and you’ll get used to them over time.
With the audio cues and bright colored outlines, the only hard part is going to be getting used to running away from both tornadoes and floor tiles, as there will be times where they trap you in a tight spot. Just stay mobile and you should be pretty safe.
The whole activity will feel very frantic at the start, but with enough time and practice, you’ll be breezing through Gauntlet clears. Also, don’t be afraid to fail. I’m sure everybody’s gotten their fair share of those pitiful loot pulls after a death, so pay no mind to anyone who tries to clown on you for it.
I’ve cleared this enough to fill up the collection log (I got the pet at 399 wins lol), and even I’ve died almost a hundred times now due to carelessness or just plain bad luck.
There’s also ways to finish this much faster, but those methods make use of risky strategies that aren’t ideal for people who are already having a hard time learning the content. Stick to the basics until you get the hang of it and can consistently do 10-minute clears.