
While the game is still very much in early access, people are already creating mods for Schedule 1. A lot of them are plain cheats, which seem silly since the ingame console and built-in list of commands cover that front pretty well, but I digress.
If you’re looking to install some in your copy, the process is relatively simple, but it’ll require a lot of downloading. Just like I did with TCG Card Shop Simulator, below is a no-nonsense guide that’ll run you through the steps as quickly as possible.
Step #1. Download MelonLoader
The first thing you’ll need to do is get MelonLoader. In that page, click on either of the automated installation options that apply to you. In my case, I went for the Windows version, which is what you are most likely going to be using too.
After downloading, run the program and then look for Schedule 1 under the list of games that it will auto-detect. If you can’t find it there for whatever reason, add it manually and look for the “Schedule I.exe” file in the game’s folder.
This will create a “Mods” folder in the game’s directory. For example, you could find it in: [DRIVE]:\SteamLibrary\steamapps\common\Schedule I\Mods.
Your directory might look a little different, since I have my folders named “SteamLibrary” as they’re not in the same place where Steam itself is installed. If you’re unsure of how to find it, right click Schedule I in your library and select Manage -> Browse local files or Properties -> Installed Files -> Browse…

Step #2. Download and Place Mods in the New Folder
Next, you’ll want to start browsing for mods to actually add to your game. For this example, let’s use the Minimap mod from Nexus Mods. I highly discourage you from downloading stuff elsewhere. Just stick to the site that’s been around for god knows how long now.
Once you’ve downloaded a mod (make sure to pick Manual, not Vortex), extract its contents to the “Mods” folder. In the case of Schedule I, it’ll usually just be a single .dll file. If there’s anything more than that, refer to that specific mod’s installation instructions on Nexus.
For this example, this is what everything should look like if you’ve been following along with a fresh installation:

Step #3. Open the Game and Test It Out
Unless you have an additional ingame mod manager on, which I’m pretty sure you can find on Nexus Mods too, then there’s nothing else you need to do except run the game and check if everything works.
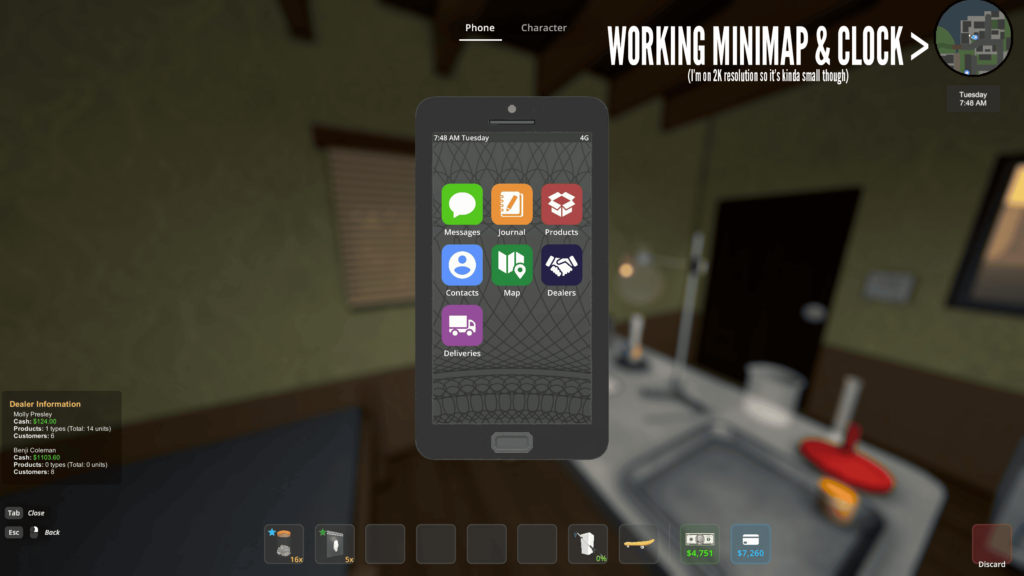
Using our example mod, which has a very self-explanatory name, you should now have a functioning minimap!
Here’s a quick sample of what it will look like ingame:
Congratulations, you have now installed your first mod for the game. Feel free to browse whatever is currently available and continue adding more. Just remember that the game is still in early access, so updates might break your mods.
Whenever that happens, you’ll just have to wait for creators to fix their mods to work with the latest version of the game. The game is still receiving fairly frequent updates as I’m writing this, so expect stuff to break often!
If you want to try out some simple QoL mods, check out my top 5 list for some stuff that are specifically chosen for how they don’t ruin the immersion or mess with the mechanics. This includes mods that add a minimap to the game or increase the trash grabber’s capacity.
On the other hand, if you want to adjust certain mechanics to make them much easier or more convenient, especially at later stages of your ingame career, I also have a list of best gameplay-altering mods for Schedule 1 that heavily change stuff like the warehouse opening times or max item stacks.